File Recognition
In: Import
If you would like to work over FE-model and FE-results data, upload first the node description, element description then and afterwards results on the FE-model. Please try to observe this sequence of steps.
The general import method applied in PragTic is based on an expectation that the user of the FE-postprocessor usually can generate information necessary for the fatigue analysis in different kinds of ASCII files. The detail of files composition can be very different, but the structure is often similar. The data are ordered to rows and columns, so that the user could puzzle them out relatively easily.
Note: The File Recognition procedure is useful only for solid elements. Results on shell and bar elements are usually related to different surfaces of shells or different fibres of beams. This fact increases number of dimensions of the necessary information. The general import method would become too complicated. I recommend you to use the import option of predefined FE-solvers file formats (*.pch, *.nas, *.dat) in such a case.
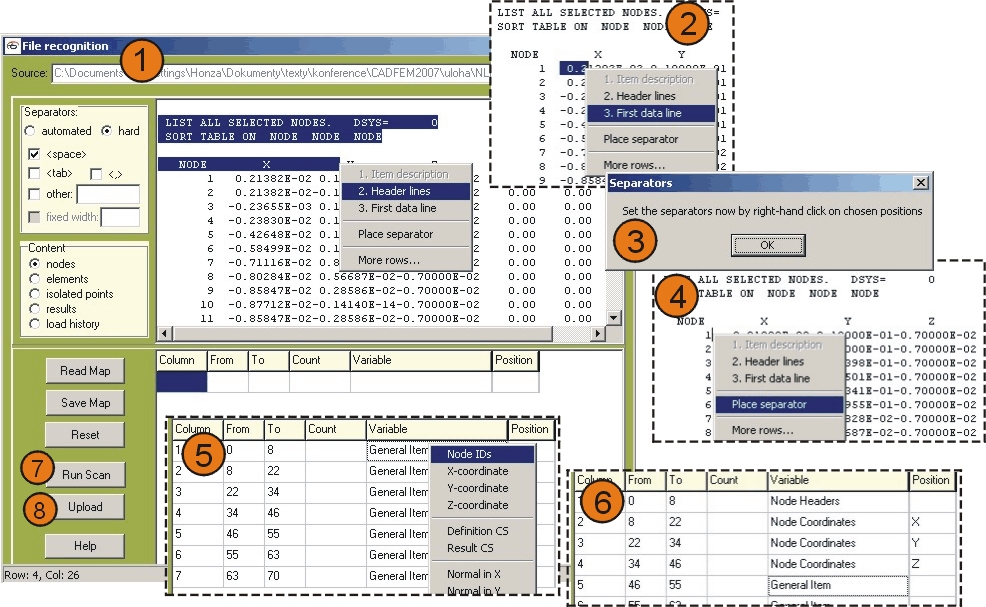
The main window of the dialogue is visually separated to two areas. Once the dialogue starts, a copy of the start of the file (200 topmost lines shortened to some 1000 characters) is copied into the large window at the top. The name of the file being processed is read into the edit line above it.
Fig.1: Typical example of a general import process with the use of hard separators
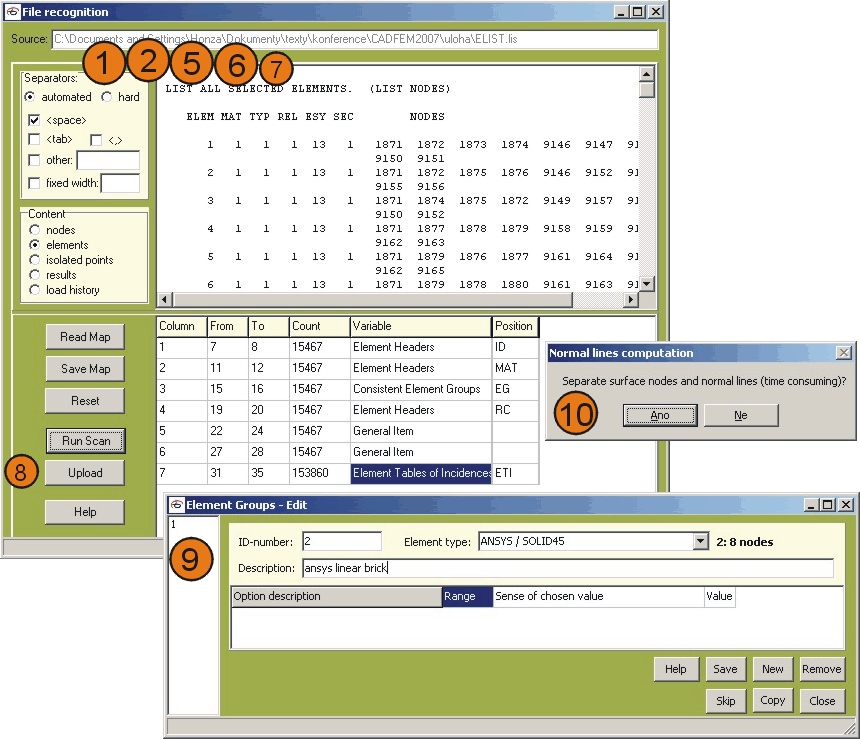
Fig.2: Example of the import process with the use of separators set automatically and the content related to elements.
1. The user should continue with selection of the kind of separators.
a) The first decision in the radio button group defines, whether the use of chosen separator types (<space>, <tab>, <,>, etc.) is sufficient (option automated) or they have to be positioned to specific positions by the user (option hard). The latter option is suitable for the cases, where there are columns in the text, which are not separated from other ones by any character. If all columns have the same width, then the option automated can be still used, but this is not the case of the ANSYS *.lis nodal record shown in Fig. 1.
b) If the automated separators were chosen, then the kind of the separators has to be set. Be aware that the program expects that if the <tab> option is chosen, no other separator should be active. If you set it in other way, it can produce very unpredictable behaviour. (This concerns above all cases where the 3D data are processed as for example are the sources for transient analysis, where the description of stress and strain tensors is produced for different times and nodes. The problem is related to the fact, that correct recognition of data relevant to each node cannot be guaranteed for cases with combined use of separators.) You can select also another type of separator, which should be input into the edit field at the right side from the marking symbol. The option fixed width is suitable for records with uniform widths of columns (set to the edit field at the right side).
c) The next step is to decide which type of input is to be read in the Content field. As concerns the data for transient analysis, these are sorted as being the result files. Sets of nodes or elements without closer description should be still classified as nodes or elements.
d) Next steps are necessary to describe the composition of the input file. The following commands can be chosen by the right hand click into the field, where the start of the file is reprinted.
e) If some 3D data (e.g. transient history - node ID x tensors dimension x time) are to be read, you have to start with selecting Item description. Just select the whole information concerning its description. (A proper example is a node number with some previous information e.g. “N: 174” for the transient history printout. Selection of the “N: “ is very important, since it says to program, which ASCII string points to this key information. Do not miss it! The attendant string is also reprinted to the first data line in the table below, so you have some check, that you selected the right one. Possibility to choose the 3D description is currently expected only within the result files and load history imports, thus it is not possible to choose it in the case of another content. Once the item is selected via this command a possibility to withdraw it is enabled through the Remove item dsc. command.
i) If the Item description was selected, you have to continue with stating if one line can bear information concerning more than one item (more nodes). This is done via selecting More items on one line. You will be prompted afterwards, how many components each item has, which means how many columns are related to a description of one item.
ii) If there are more items on one line, you have to specify, whether the full item results printout is made (check of Complete item first), or the the information concerning one item is dispersed over the line (i.e. if first one particular tensor component is printed for all items, than other one – than the Complete item first should remain unchecked).
f) Header lines are the first part you have to specify, if 3.a) point was omitted. Select by mouse all the header lines, which are preceding the raw data. There are formats, where the header lines repeat after some specific number of lines (ANSYS), so this option says to data convertor, that they have to be skipped and that the raw data continue in the same manner after them. Since the formatting of output files is usually very similar, the recognition of header lines is done by comparison of the first string on the line only. If they are the same, the line is recognized as a header, but the import is finished if they are not. The Item description is currently searched for only within the header lines, nowhere else.
2. The last thing you have to specify in the right-hand click pop-up menu is the First data line, which is the first line where the raw data record starts. Number of data columns is read from this first data line. A line is reserved in the table below for each column. Once you select it another kind of right-hand click pop-up menu is adjoined, which will later allow you to describe the columns’ content. If you have done whatever badly, do not panic but push the Reset button in the group of buttons at the left side.
There is one more command in the pop-up dialogue. This is the More rows… command, which should be used, if you find, that either header lines or first data line are not within the lines extracted to the preview window.
3. If the hard separators were chosen, only one column was read to the table below. The user is notified, that he has to manually set the position of separators separating the individual columns.
4. Place the cursor to the individual positions, where the separator should lie and select the command Place separator from the right-hand click pop-up menu. Each new separator also new line in the table below.
5. Once the table at the right bottom side reflects all the columns in the record, you have to continue at it. There are the lines corresponding to the columns now. Use the right-hand click into the selected line in the table. Once any group of meanings is assigned, the same dialogue is automatically opened for the line below, so you can proceed relatively rapidly. If you do not wish to upload any particular column, just tick the Do not import option, which assigns General item meaning to it. Be prepared, that if you select Related nodes meaning for any column within the element descriptions import, all the lines below are expected to be also description of element table.
Note: There are ASCII files, where any line starts with an introductory string designating the line contents (NASTRAN description of elements e.g. starts with the string EL). Choose the designation Descriptor for such a starting string, otherwise the upload will be stopped since it finds the first item on line being string.
6. If you are satisfied with the settings up to now, try to save them into a map of ASCII file. Use the Save Map button for it. Works with files structured similarly can be simplified a lot. If you sometime later push the button Read Map while importing file with similar structure, the settings are read, thus you can skip the steps 1-6. Just try it!!!
Well, if you made anything wrong, do not worry and press the Reset button. This will return you back to the step 1.
7. In order to know, what is the dimension of imported data, press the Run Scan button. This is necessary so do not skip it - the program allocates space for the read items according to it. You will get another check here, that everything works by comparing number of items in each column (well – line as regards the table).
8. Push the Upload button. The upload can take relatively significant amount of time, especially in the case of uploading the element information. Here you’ll be queried, if you want to detect automatically the surface nodes and normals automatically. If you do not have other source of normal lines description and you would like to perform multiaxial analysis, please use this option. I added a status bar at the bottom, so that you’ll be informed about the import process at least within the upload of elements.
9. If you are uploading elements' description, you will be asked during the upload to define, what are the element groups related to elements. If the elements' description includes the related ID number of element groups, the user is prompted to define its meaning in the dialogue in Fig. 2 below. If the element groups property is not included in the read element record, the only way of different groups definition is the number of nodes related to each element. Every unique number of nodes in the element is sorted as a special element group item and the user is asked to classify it.
Be aware that there is a length limit of 200 000 characters on one line in the input ASCII file. Longer lines will not be read successfully.
More:
© PragTic, 2007
This help file has been generated by the freeware version of HelpNDoc